Here are 30 ultimate Windows VPS tips and tricks. Updated for 2021. This video is the ultimate compilation of VPS Windows 10 tips and tricks to enhance your skills using Microsoft Windows. Let’s get started!
#1 Windows-V in VPS Windows 10.
You may be aware already that you can highlight text, hit Ctrl-C and then Ctrl-V to paste it. That copies that text to the clipboard and then allows you to paste it in any Windows 10 app. The one problem with this feature is that only keeps track of the last item you’ve copied to the clipboard but Windows-V makes this even better.
Come down here to the Start menu, go to Settings, into System, and then choose Clipboard. Here you can enable the clipboard history and you can choose to sync it across different devices if you want. Once that’s set, now when you copy it places those items in the clipboard and holding down the Windows-V shows you multiple items that are in your clipboard.
You can select one and insert it into your app. Windows-V again and I can select a second item. Windows-V is a great new feature to keep track of multiple copy/paste options in your clipboard.
#2 Snip and Sketch in Windows VPS.
Snip and Sketch is a replacement for the Snipping tool from Windows 10. You can access it by typing snip in the menu and opening up Snip and Sketch or you can press the Windows logo key + Shift + S as a keyboard shortcut. Snip and Sketch lets you capture screen clippings and edit them and save them as a file. If you create a new snip you have choices at the top to do a rectangular snip, you can do a free-form one, or you can capture an entire window, or this full screen.
If you choose the rectangular snip then you just mark an area on your screen you want to capture and it loads it into Snip and Sketch. Here you can draw, you can use a highlighter, and use an eraser to erase those, use a ruler, and you can crop the image as well. When you’re done you can save the image, copy it and paste it somewhere, or share it.
You also have the ability to print or open it with another application. One other option you have is down in the notifications area you can choose Screen Snip which lets you do the same thing and it loads that snip to the clipboard where you can see it inside of Snip and Sketch and do your editing again. So if you need to capture any image on your screen use Snip and Sketch.


#3 Aero Shake in VPS Server Windows 10.
Aero Shake gives you the ability to close all the windows except the one that you have selected. If you click on the header portion on the top of a window and then shake it back and forth it closes all the windows behind it. Shake it again and it brings them back. That’s Aero Shake.
#4 Snap Assist in Windows VPS.
Snap Assist is another way to manage windows on your screen. If you grab a header of a window and drag it to the top it snaps it into a full screen. You can do the same thing by dragging it over to a corner and it brings it up into the corner section of the screen.
You can do it on either side or the top and bottom. If you drag it all the way to the left it gives you the choice to select a second window to put on the right and it evenly splits them between the two sides of the screen. Snap Assist is controlled by going to the Start menu, Settings, System, Multitasking, and make sure you’ve turned on this option for Snap Windows and there’s some additional settings here as well.
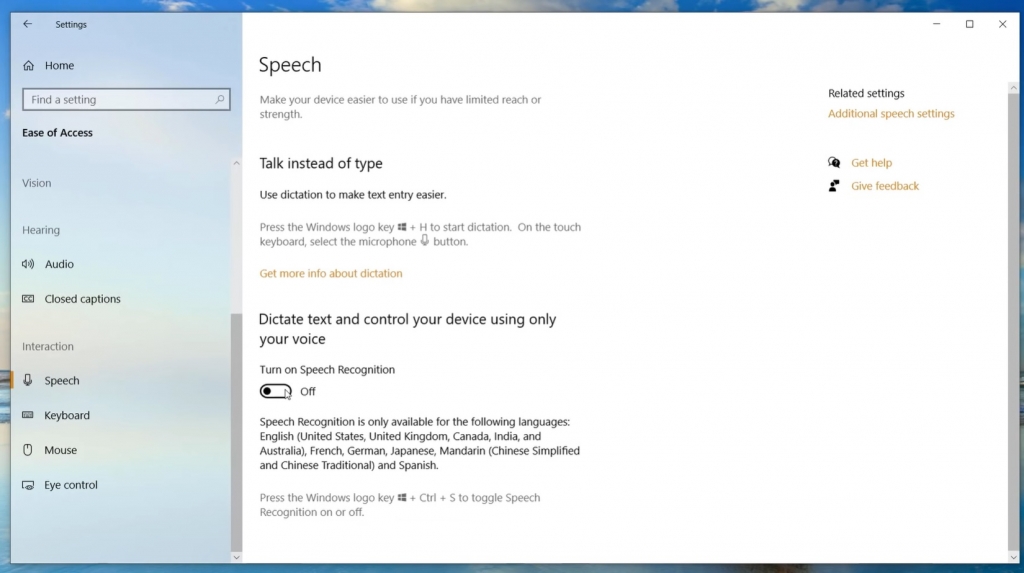
#5 Dictation in Windows VPS.
Dictation is a brand new feature in VPS Windows 10 that allows you to record your voice into different apps. You can enable it by going to Start, Settings, Ease of Access, and scroll down here to Speech. Turn this Speech Recognition on and it enables the dictation control. You can also press the Windows key + Ctrl + S to toggle speech recognition on and off.
When it’s enabled you can tell it what to do. Open notepad. let’s record some text into notepad and see how it looks. period. enter. enter. You can also do corrections. Select the last word. Strike that. Select the last paragraph. Strike that. Once you turn it off you can go back to regular use. Dictation is really cool so give it a try. #
6 Dark Mode.
Windows 10 has a new dark mode setting. It’s available from the menu under Start, Settings, Personalization, Colors, and here you have a choice of light, dark, or custom. Essentially those settings will choose the default windows mode and the default app mode so if you select dark from the menu it sets both in dark and if you choose light from the menu it sets both to light. I personally prefer the dark windows mode with the light app mode but you can set them however you like.
Cheap VPS USA